Apache Kafka®️ 비용 절감 방법 및 최적의 비용 설계 안내 웨비나 | 자세히 알아보려면 지금 등록하세요
How to Better Manage Apache Kafka by Exporting Kafka Messages via Control Center
This blog post is the second in a four-part series that discusses a few new Confluent Control Center features that are introduced with Confluent Platform 6.2.0. This blog post focuses on easily exporting Apache Kafka® messages in JSON or CSV format with a few clicks in the Control Center UI. This blog series highlights the following new features that make managing clusters via Control Center an even smoother experience:
- Create Kafka messages (with key and value) directly from within Control Center
- Export Kafka messages in JSON or CSV format via Control Center
- Improved topic inspection by showing the last time that a message was produced to a topic
- Remove residue data from old Control Center instances with a cleanup script
If you are not too familiar with Control Center, you can always refer to the Control Center overview first. Having a running Control Center instance at hand helps you explore the features discussed in this blog series better.
Now that you are ready, let’s delve into the second feature here in part 2: exporting Kafka messages via Control Center.
- What ”exporting Kafka messages” is: A description of the feature and its intended audience
- How to download messages from the UI: Step-by-step tutorial on how to download messages
- How to find messages: Learn about how to better navigate through “Messages” page
- Beyond downloading messages from the UI: Learn about other ways to move messages around
What “exporting Kafka messages” is
Control Center 6.2.0 enhances the existing download functionality in the “Topics” page to support message export in JSON, CSV (recently added in 6.2.0), or both formats. This is a simple yet effective tool if you are working with KafkaProducer, Confluent Schema Registry, or Control Center. For example, download a handful of messages from within Control Center for manually inspecting the messages produced by KafkaProducer, for manually inspecting new schemas being applied to messages, or for aiding troubleshooting any Kafka message-related errors in Control Center.
If you want to move data around in a production fashion, please check out Kafka Connect. Kafka Connect allows you to copy data between Kafka and other systems seamlessly: JDBC, JMS, Elasticsearch, and Amazon S3, just to name a few. You can use source connectors to move data from your system into Kafka clusters and sink connectors to move data from Kafka clusters out to your system. This option is intended for a production environment for moving data scalably and reliably across systems.
For outdated JSON-format-only message download documentation, please refer to this resource on downloading selected topic messages.
How to download messages from the UI
The following are the steps used to download individual messages via Control Center:
- Select the topic that you want to download messages from and click the “Messages” tab.
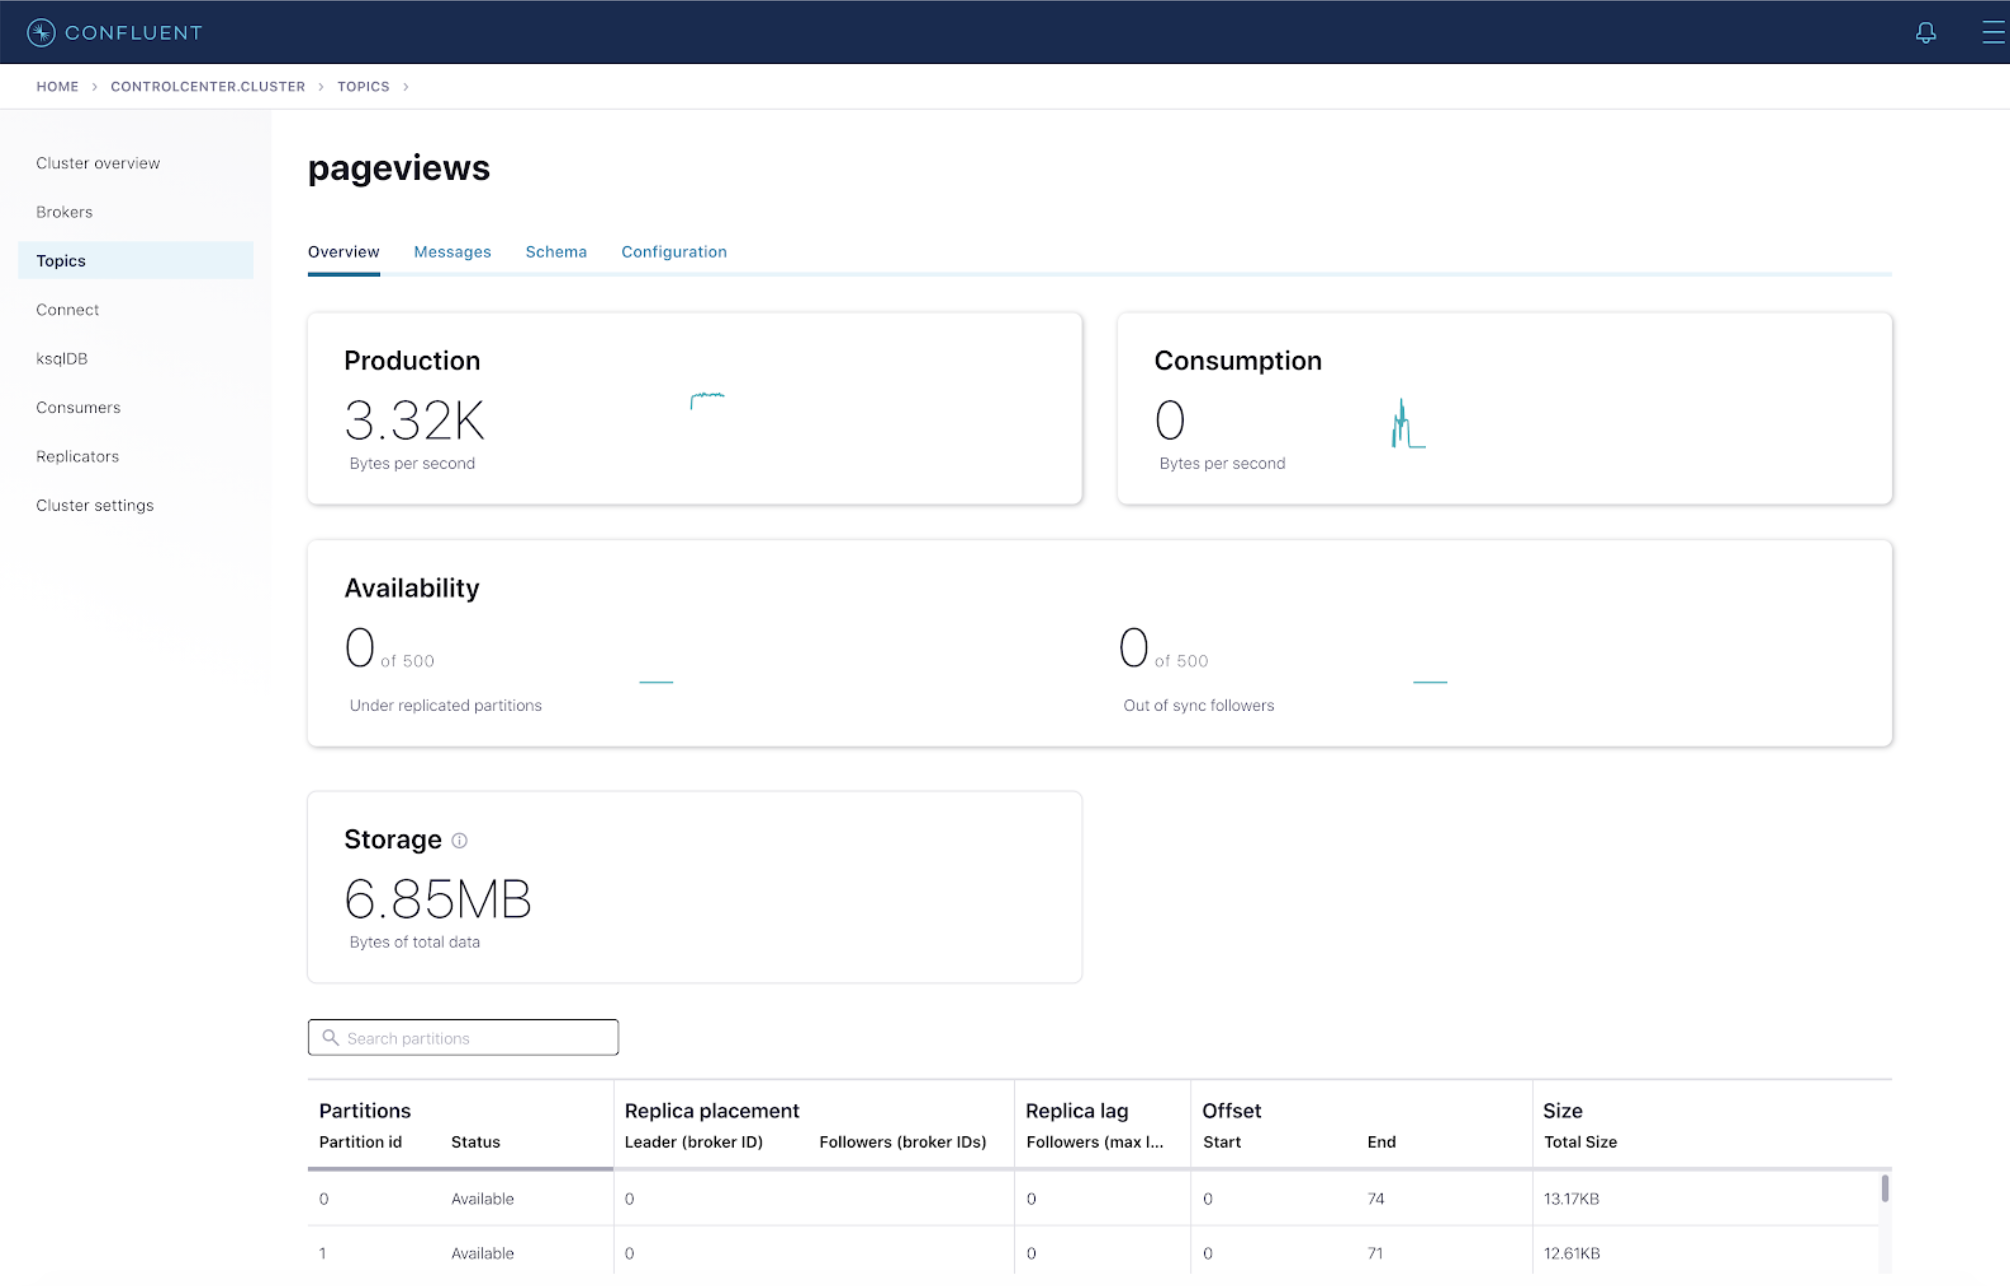
- Select the messages that you would like to download. Tip: You can click the pause icon at the top to stop messages from loading onto the UI.
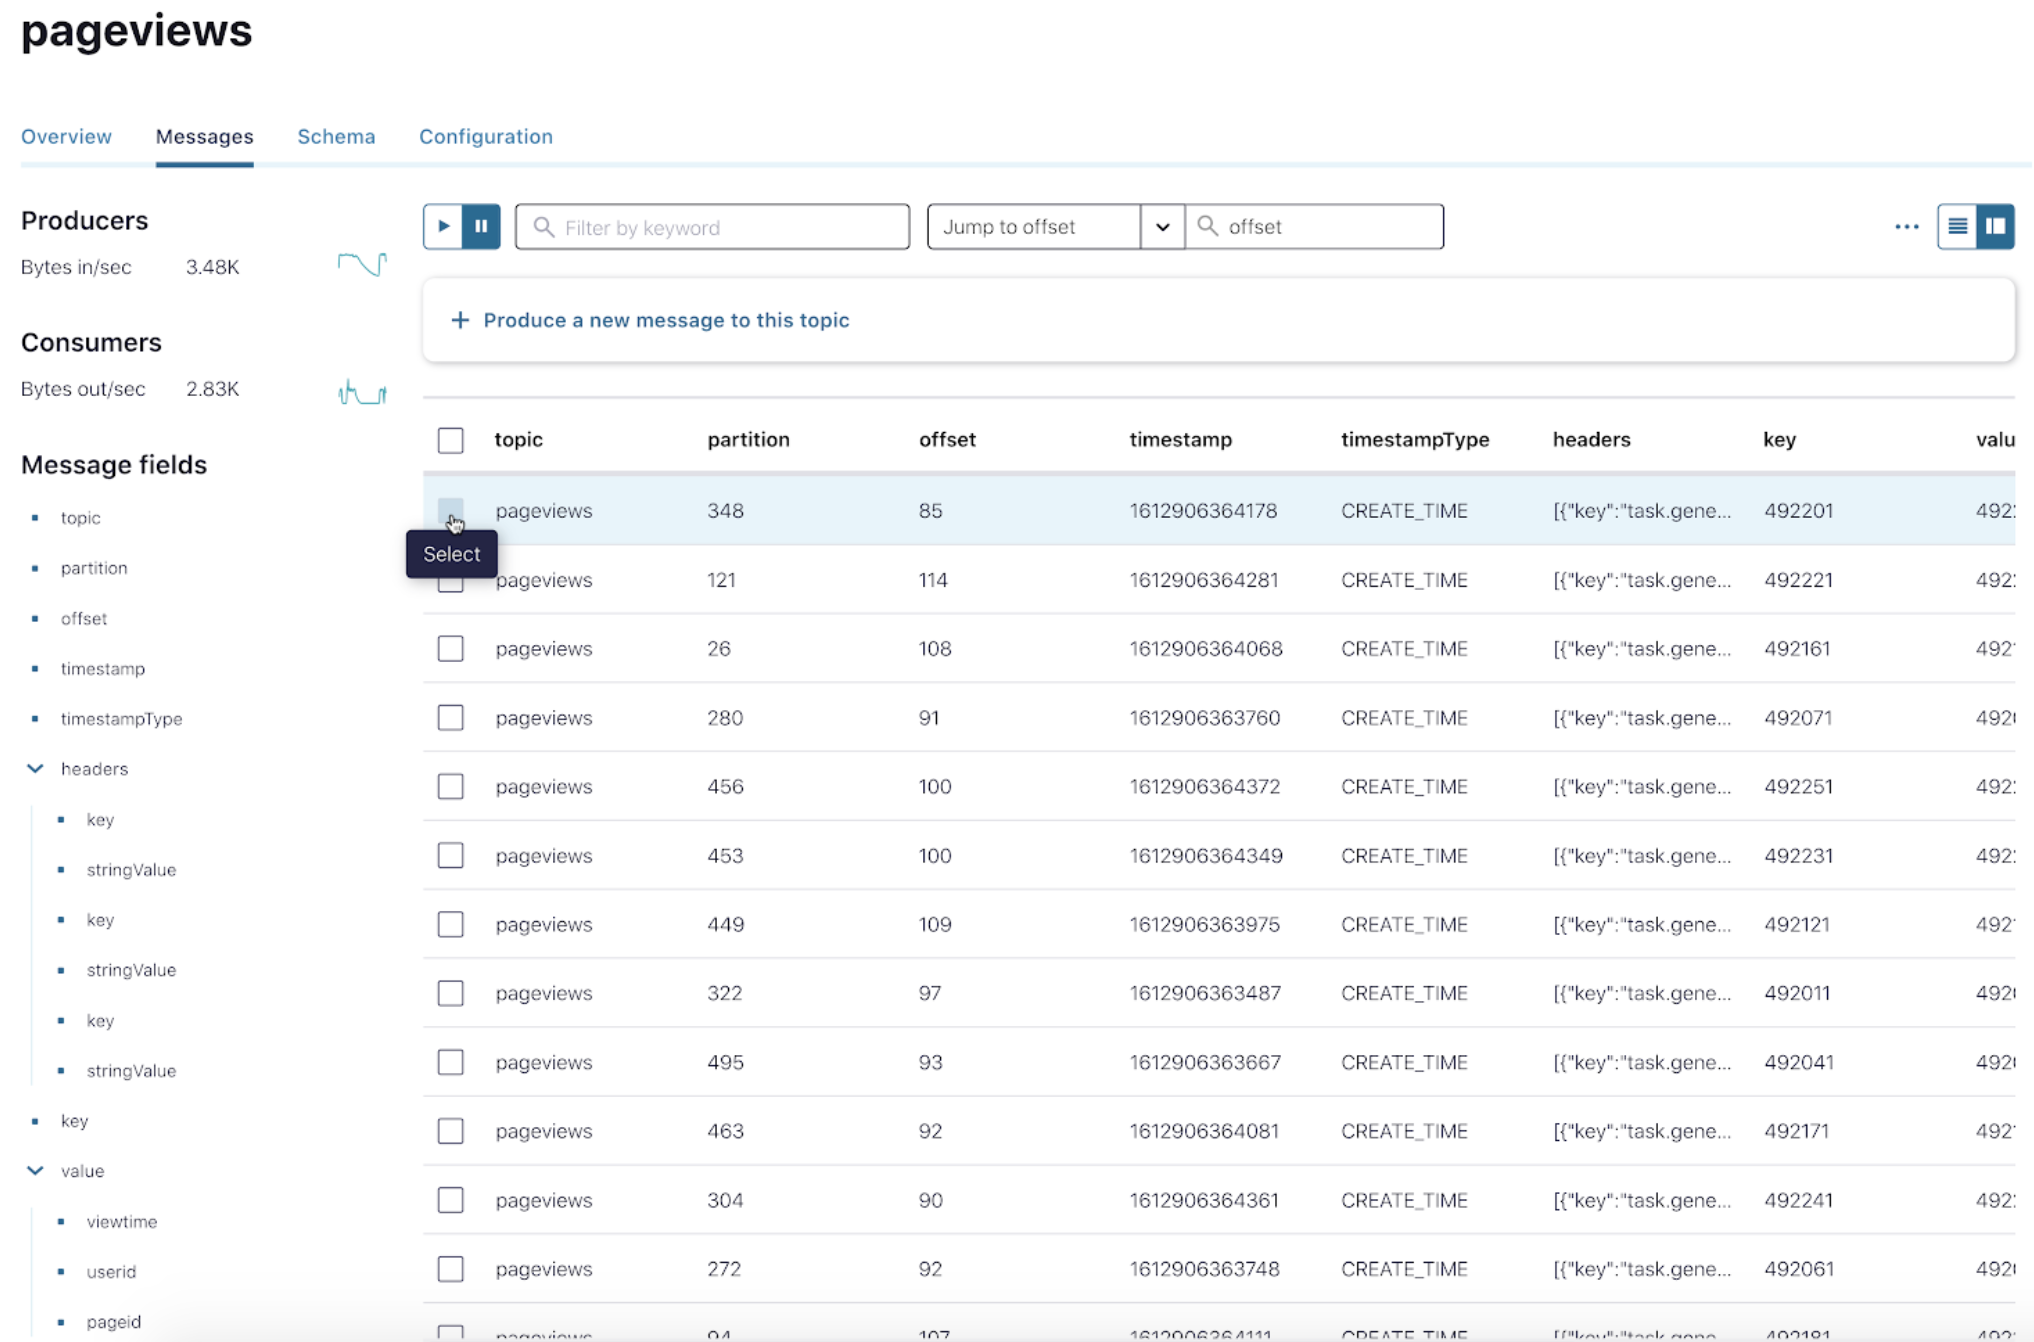
- Select your preferred format and click Download. You can select both the JSON and CSV formats.
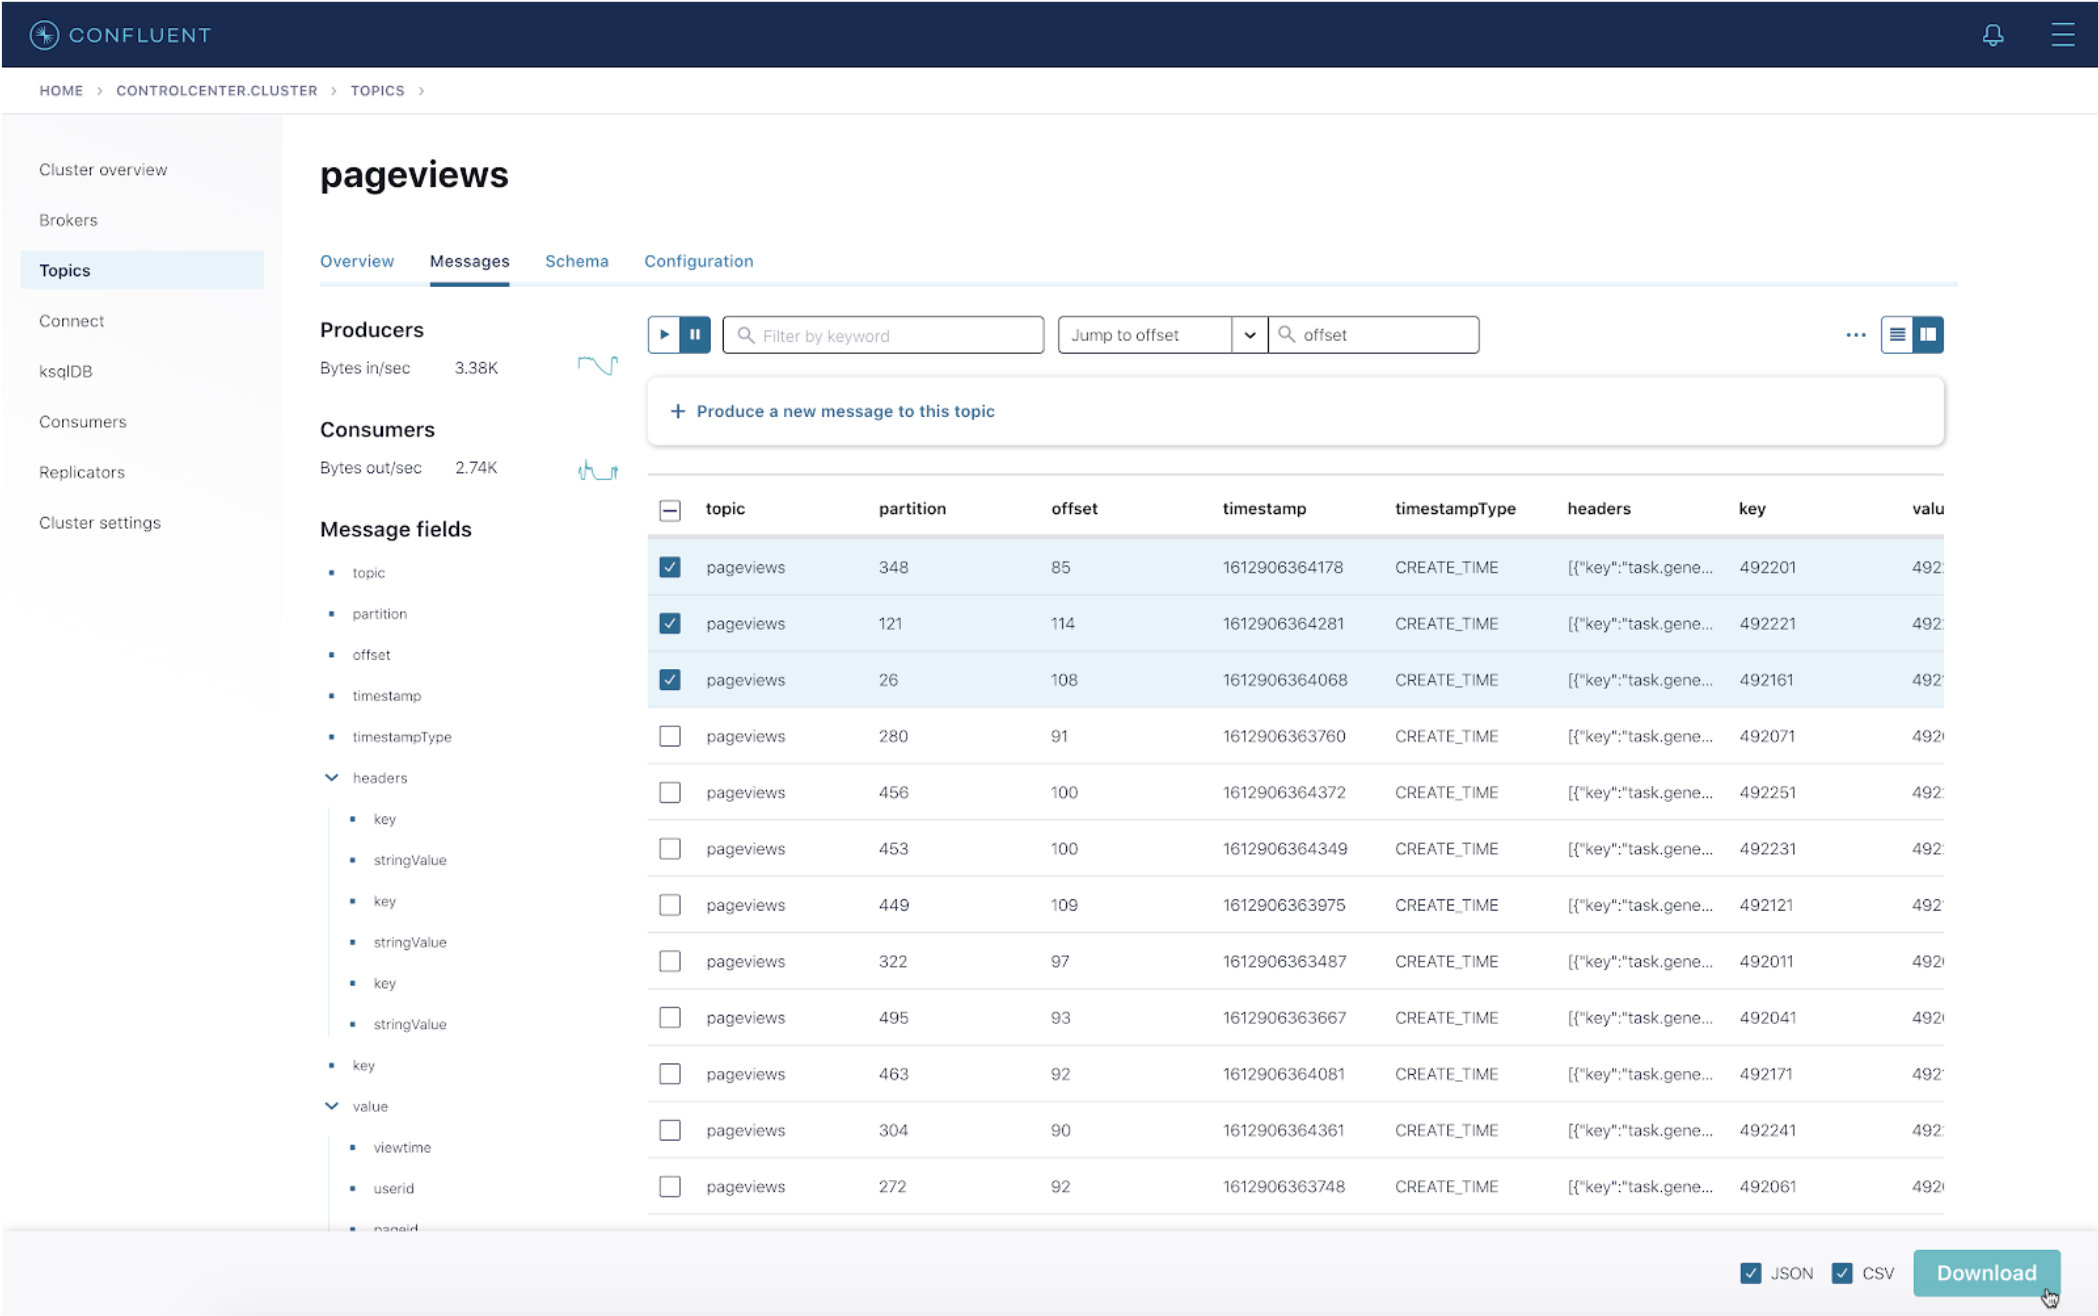
- Here’s an example of what downloaded CSV looks like:
And here is its downloaded JSON:
[
   {
       "topic": "pageviews",
       "partition": 26,
       "offset": 108,
       "timestamp": 1612906364068,
       "timestampType": "CREATE_TIME",
       "headers": [
           {
               "key": "task.generation",
               "stringValue": "0"
           },
           {
               "key": "task.id",
               "stringValue": "0"
           },
           {
               "key": "current.iteration",
               "stringValue": "49216"
           }
       ],
       "key": "492161",
       "value": {
           "viewtime": 492161,
           "userid": "User_3",
           "pageid": "Page_69"
       },
       "__confluent_index": 18,
       "id": 18
   },
   // the other two messages omitted for simplicity
]
How to find messages
With the amount of information constantly loading on the “Messages” page, it can be a challenge to find the messages that you are looking for and to download them. To address this problem, version 6.2.0 enhances the Control Center UI’s capability of hiding columns for messages. This is a great feature if you want to drill down to certain aspects of the message—say, only the key and value of a message—for a cleaner UI view.
An important point to note is that the Show/hide columns feature helps you eliminate part of the messages that you do not want to see on the Control Center UI for a clean view. However, when you download messages from the UI after hiding columns, the downloaded messages will still contain the full payload, including the columns that you have hidden.
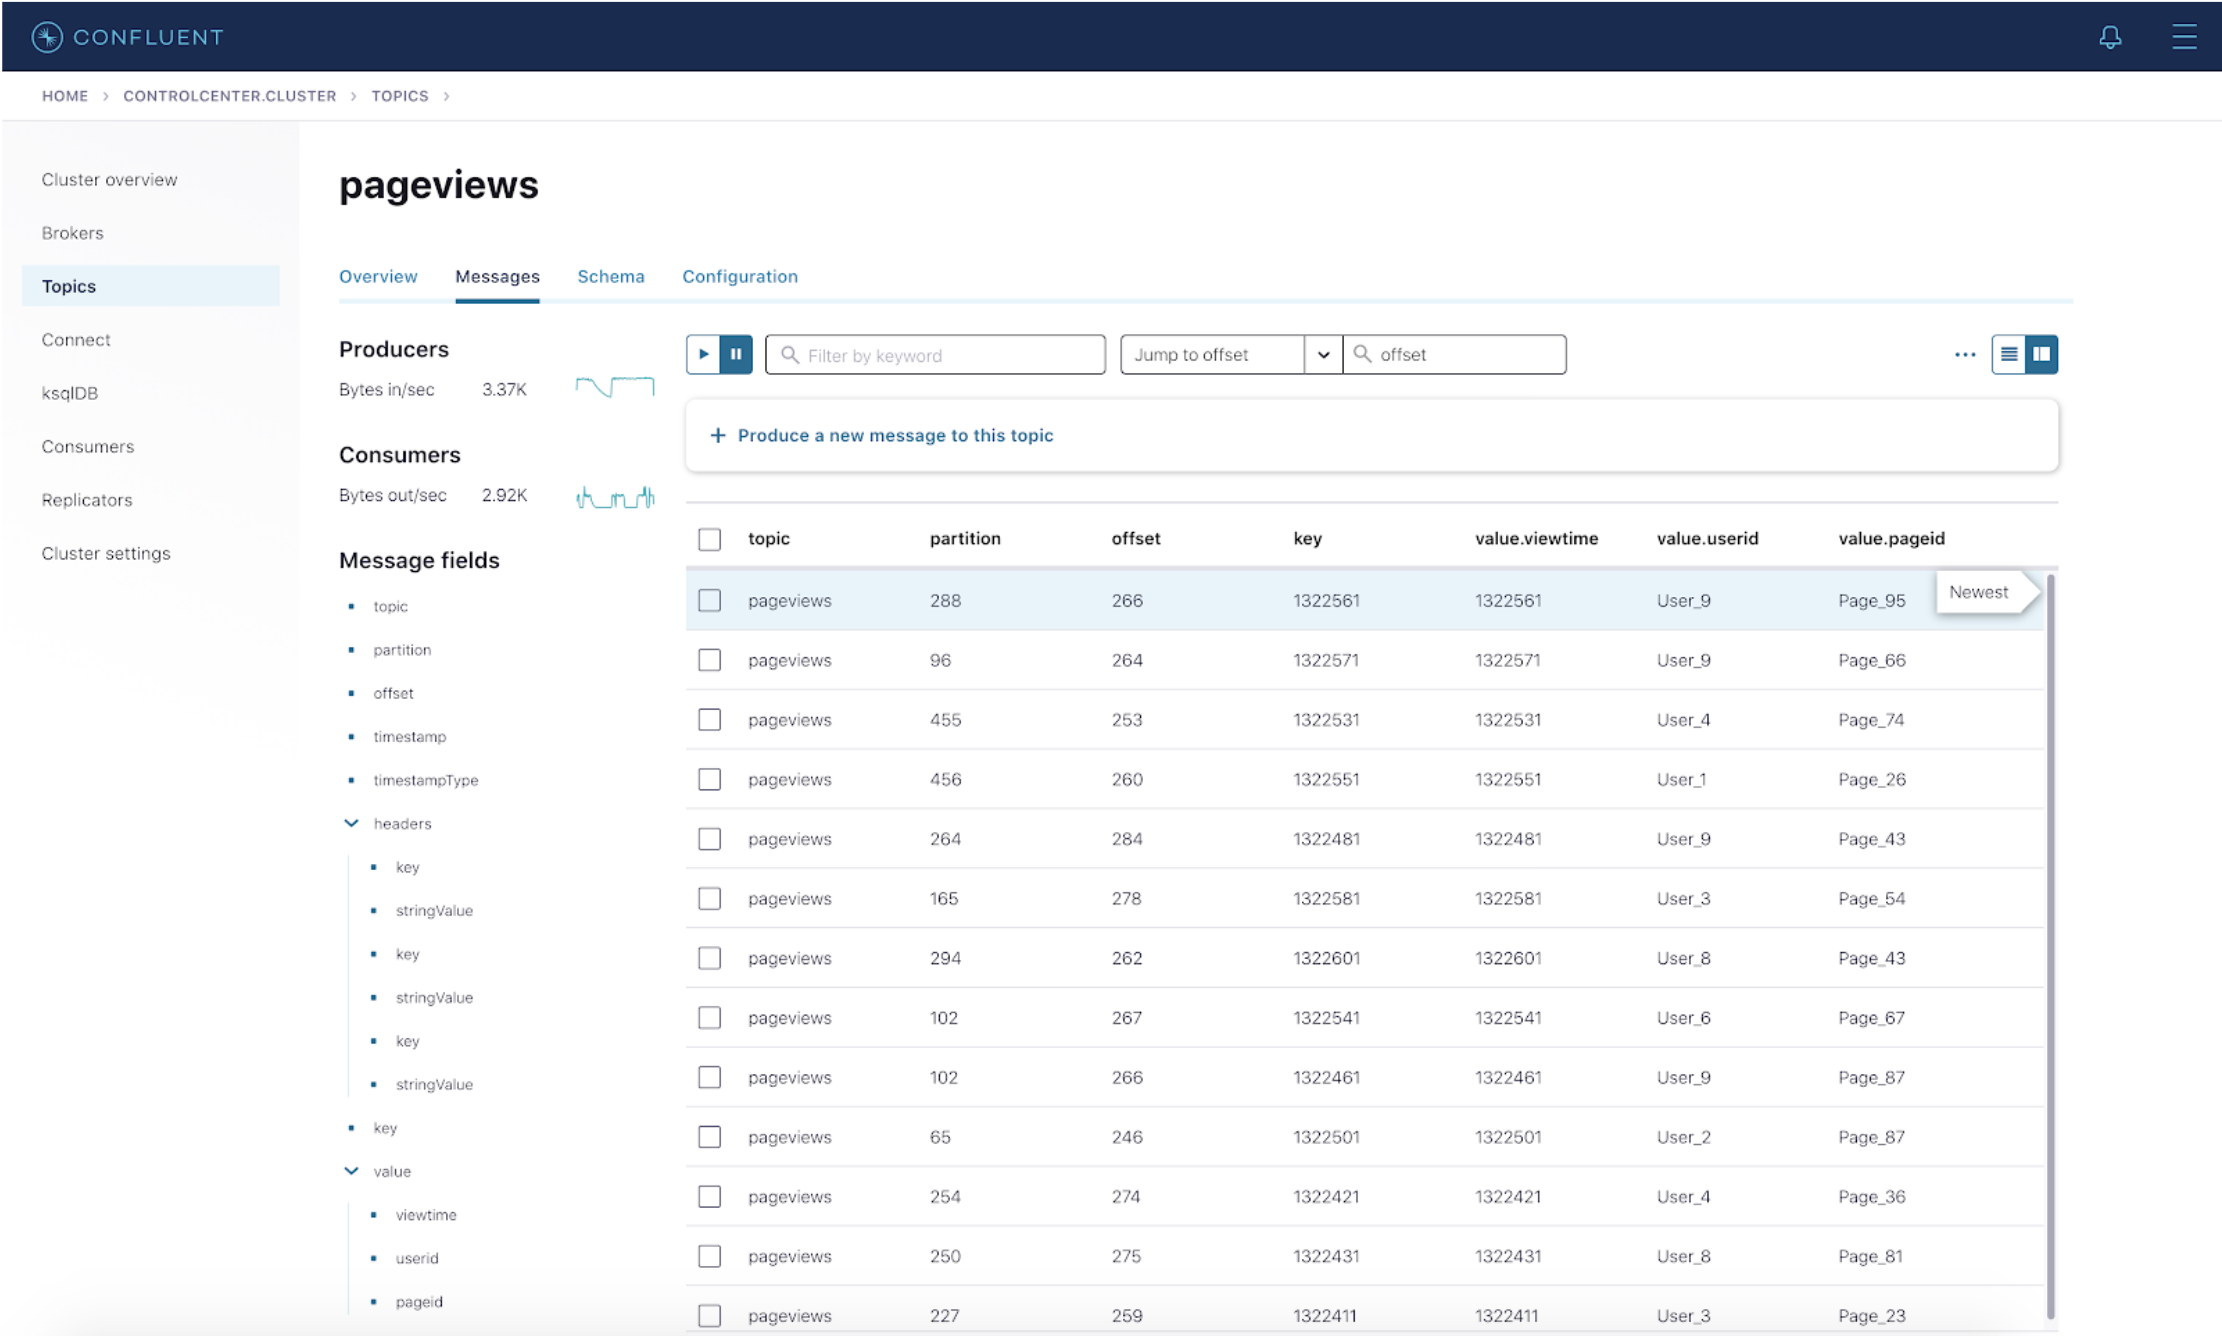
The following illustrates the steps to hiding a few columns—namely timestamp, timestampType, and headers—so that there is a clean view of the key and value of the messages.
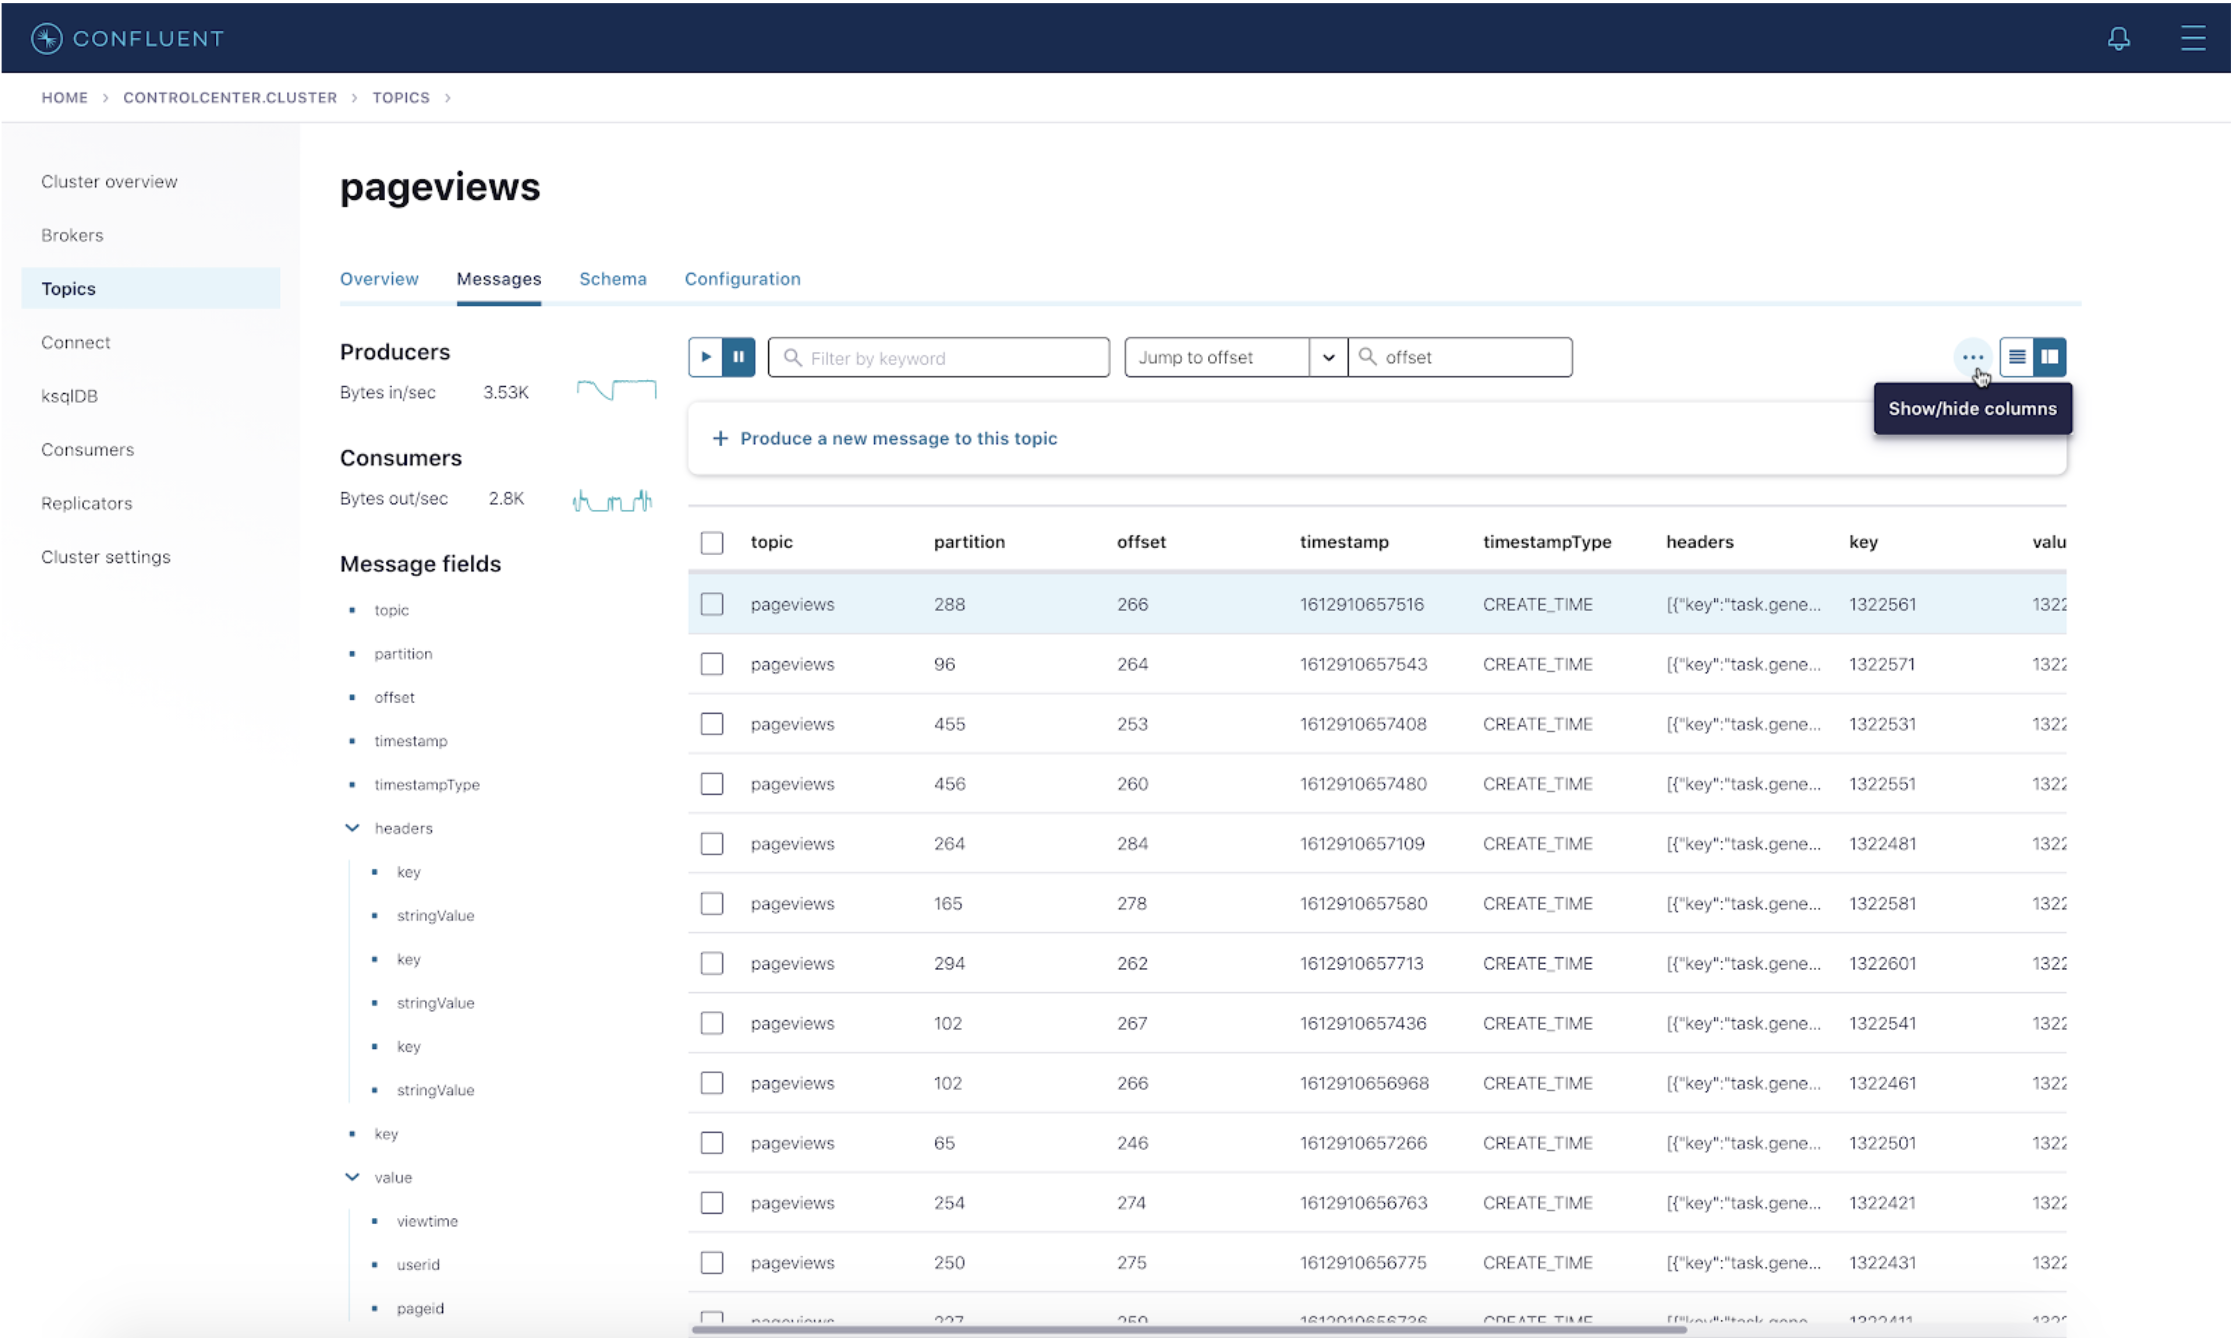
- In order to hide those three columns, click on the three dots on the upper right corner, then click on Show/hide columns.
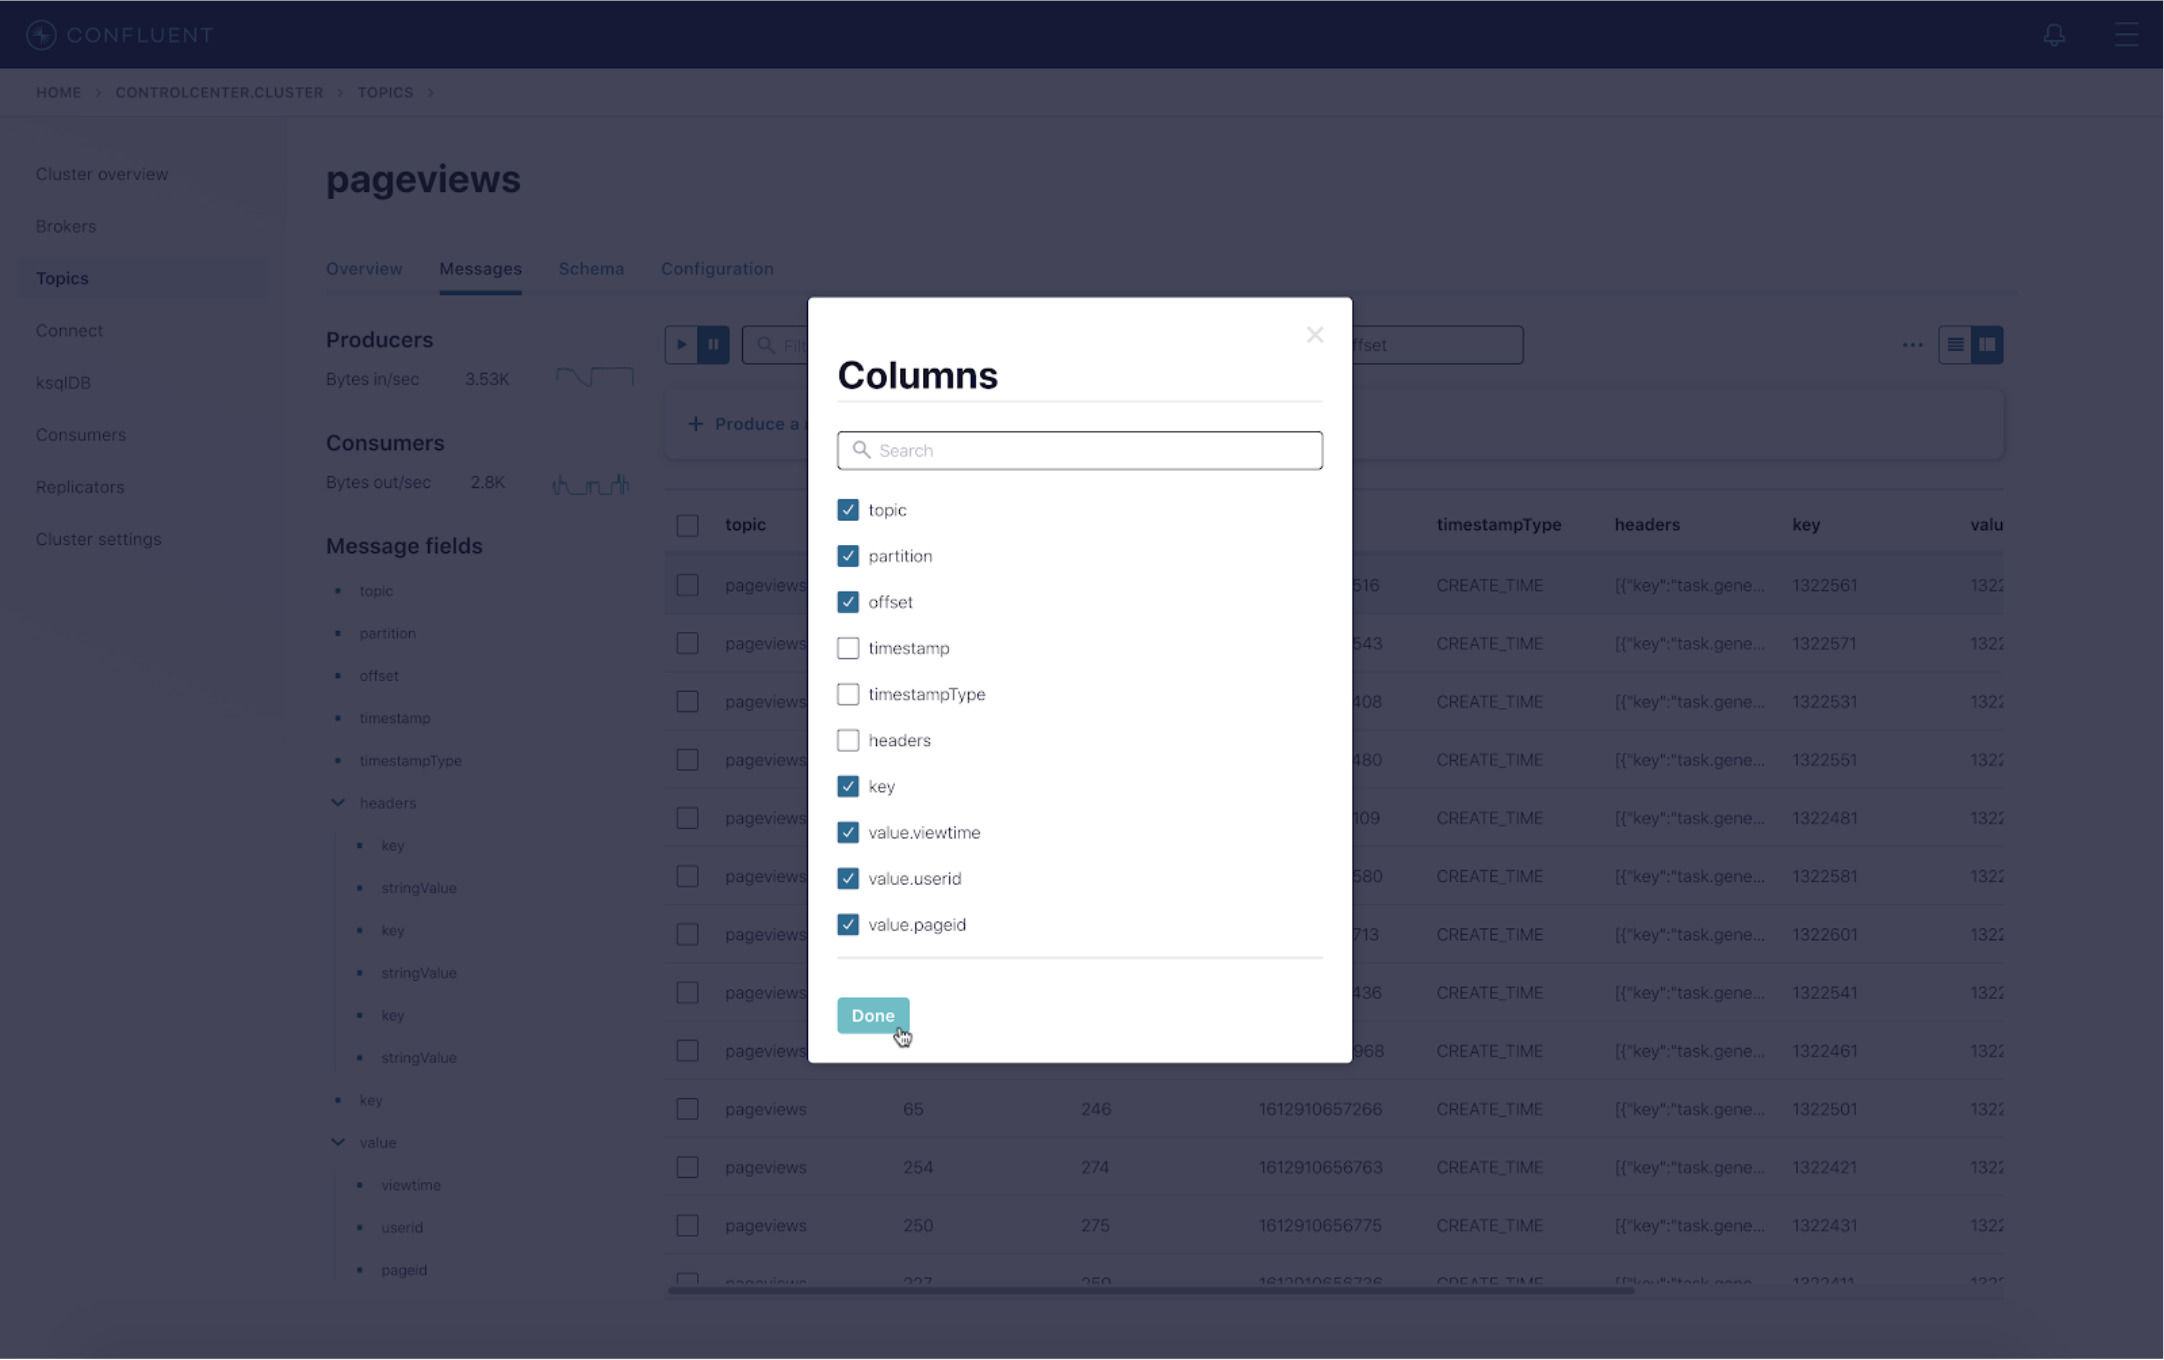
- Deselect the columns that you do not want to see on the UI—in this example, timestamp, timestampType, and headers. Then click Done.
- Now you see that the “Messages” page has hidden the three columns that were deselected.
Beyond downloading messages from the UI
Downloading messages from the Control Center UI is intended for one-off downloads with a limited quantity of data (10–50 messages recommended). If you would like to perform a one-off download with a slightly larger quantity—still in a non-production environment—you can leverage the Control Center data export tool.
The Control Center data export tool, bin/control-center-export script, is a part of the CLI tools for Confluent Platform. This tool is only shipped with Confluent Platform, not Confluent Cloud. By default, the Control Center data export tool exports the following fields: topic, partition, timestamp, key, and value.
To run the tool, you need a Control Center properties file to establish the initial connection to the Kafka cluster, a topic name to export data from, and an output file to write data to. It is important to note that even though this script relies on a Control Center properties file, it does not rely on a Control Center instance to be up and running.
Navigate to your $CONFLUENT_HOME, and run the command below:
bin/control-center-export <props_file> -topic <your_topic> -outfile <your_outfile>
The tool accepts the following parameters:
Options (* = required)			Description
-----------------------------		-----------------------------
-format, --format <arg>			Format to export messages. Use json or csv,
					   where the default format is json.
-from, --from <arg>			Start consuming from this timestamp.
* -outfile, --outfile <arg>		File to dump output.
-prop, --property <property=value>	Properties to initialize the message
					   formatter. Properties include:
					   | allow.errors=true (default) | false. If this is
					       set to false, any program exception will
					       halt the export process.
					   | print.topic=true (default) | false
					   | print.partition=true (default) | false
					   | print.timestamp=true (default) | false
					   | print.key=true (default) | false
-to, --to <arg>				Consume data until this timestamp.
* -topic, --topic <arg>			Topic to consume data from.
For example, if you want to consume messages from the topic pageviews in csv format, disallow any errors while exporting all fields except for timestamp, and dump the data to output.csv, then run the following:
bin/control-center-export control-center.properties -topic pageviews -outfile output.csv -format csv -prop allow.errors=false -prop print.timestamp=false
Summary
In summary, exporting Kafka messages via Control Center is a useful tool that allows you to download a handful of messages and examine individual messages in either JSON or CSV format.
Other articles in this series
To learn about other new features of Control Center 6.2.0, check out the remaining blog posts in this series:
이 블로그 게시물이 마음에 드셨나요? 지금 공유해 주세요.
Confluent 블로그 구독
Unified Stream Manager: Manage and Monitor Apache Kafka® Across Environments
Unified Stream Manager is now GA! Bridge the gap between Confluent Platform and Confluent Cloud with a single pane of glass for hybrid data governance, end-to-end lineage, and observability.
Introducing Confluent Private Cloud: Cloud-Level Agility for Your Private Infrastructure
Confluent Private Cloud (CPC) is a new software package that extends Confluent’s cloud-native innovations to your private infrastructure. CPC offers an enhanced broker with up to 10x higher throughput and a new Gateway that provides network isolation and central policy enforcement without client...

